跳转至

2025

云服务器使用docker部署RuseDest服务

1.参照官网步骤

  • https://rustdesk.com/zh-cn/
  • https://blog.csdn.net/networken/article/details/140536087

步骤 1:安装 Docker

Text Only
1
bash <(wget -qO- https://get.docker.com)

步骤 2:下载 compose.yml

Text Only
1
wget rustdesk.com/oss.yml -O compose.yml

Text Only
1
wget rustdesk.com/pro.yml -O compose.yml

步骤 3:启动 Compose

Text Only
1
docker compose up -d

运行成功会在当前路径下生成 data文件夹其中密钥文件为xx.pub

Text Only
1
cat ./data/id_ed25519.pub

准备就绪!

2.登录阿里云控制台,配置防火墙规则,开通以下端口

放通TCP端口 21115、21116、21117 放通UDP端口 21116

3.连接验证

服务端搭建好后,在要连接的两个客户端设备上都下载 RustDesk 客户端。

下载地址是:https://github.com/rustdesk/rustdesk/releases

首先找到 RustDesk 客户端的 设置 -> ID/中继服务器 ,然后输入如下三个信息

ID 服务器:rustdesk.example.com:21116,默认端口为21116时可以省略端口配置

Key:填写部署服务默认生成的 id_ed25519.pub 文件中的内容

示例配置

按照图片高度拆分为多个图 DeepSeek(元宝) 按需求写代码,零修改

  • 需求:写个python 脚本,读取图片,按照图片高度拆分为多个图,比如 输入5 时,按高度截取为5个子图
Python
 1
 2
 3
 4
 5
 6
 7
 8
 9
10
11
12
13
14
15
16
17
18
19
20
21
22
23
24
25
26
27
28
29
30
31
32
33
34
35
36
37
38
39
40
41
42
43
44
45
46
47
48
49
50
51
52
53
54
55
56
57
58
import argparse
import os
from PIL import Image

def validate_arguments(input_path, num_split):
    if not os.path.isfile(input_path):
        raise FileNotFoundError(f"输入文件 {input_path} 不存在")
    if num_split <= 0:
        raise ValueError("拆分数量必须大于0")

def split_image(input_path, output_dir, num_split):
    # 验证参数有效性
    validate_arguments(input_path, num_split)

    # 打开原始图片
    img = Image.open(input_path)
    width, height = img.size

    # 检查拆分数量是否超过图片高度
    if num_split > height:
        raise ValueError(f"拆分数量({num_split})超过图片高度({height})")

    # 计算每个子图的高度分配
    split_height = height // num_split
    remainder = height % num_split

    # 生成高度列表(前remainder个子图高度+1)
    heights = [split_height + 1 if i < remainder else split_height 
               for i in range(num_split)]

    # 准备输出目录和文件名
    os.makedirs(output_dir, exist_ok=True)
    filename = os.path.basename(input_path)
    name, ext = os.path.splitext(filename)

    # 拆分并保存图片
    current_height = 0
    for i, h in enumerate(heights):
        # 计算裁剪区域
        box = (0, current_height, width, current_height + h)
        cropped_img = img.crop(box)

        # 生成输出路径
        output_path = os.path.join(output_dir, f"{name}_{i}{ext}")
        cropped_img.save(output_path)

        current_height += h

if __name__ == "__main__":
    # 配置命令行参数解析
    parser = argparse.ArgumentParser(description="将图片按高度拆分为多个子图")
    parser.add_argument("-i", "--input",  required=True, help="输入图片路径")
    parser.add_argument("-o", "--output", required=True, help="输出目录")
    parser.add_argument("-n", "--num_split", type=int, required=True, help="拆分数量")

    # 解析参数并执行拆分
    args = parser.parse_args()
    split_image(args.input, args.output, args.num_split)

运行

Text Only
1
python aa.py -i 1.jpg -o o -n 5

Windows资源管理器侧边栏有两个onedrive快速访问,如何删除其中一个?

  • 转载自 https://blog.csdn.net/qq_40483419/article/details/145280493

1. 场景还原

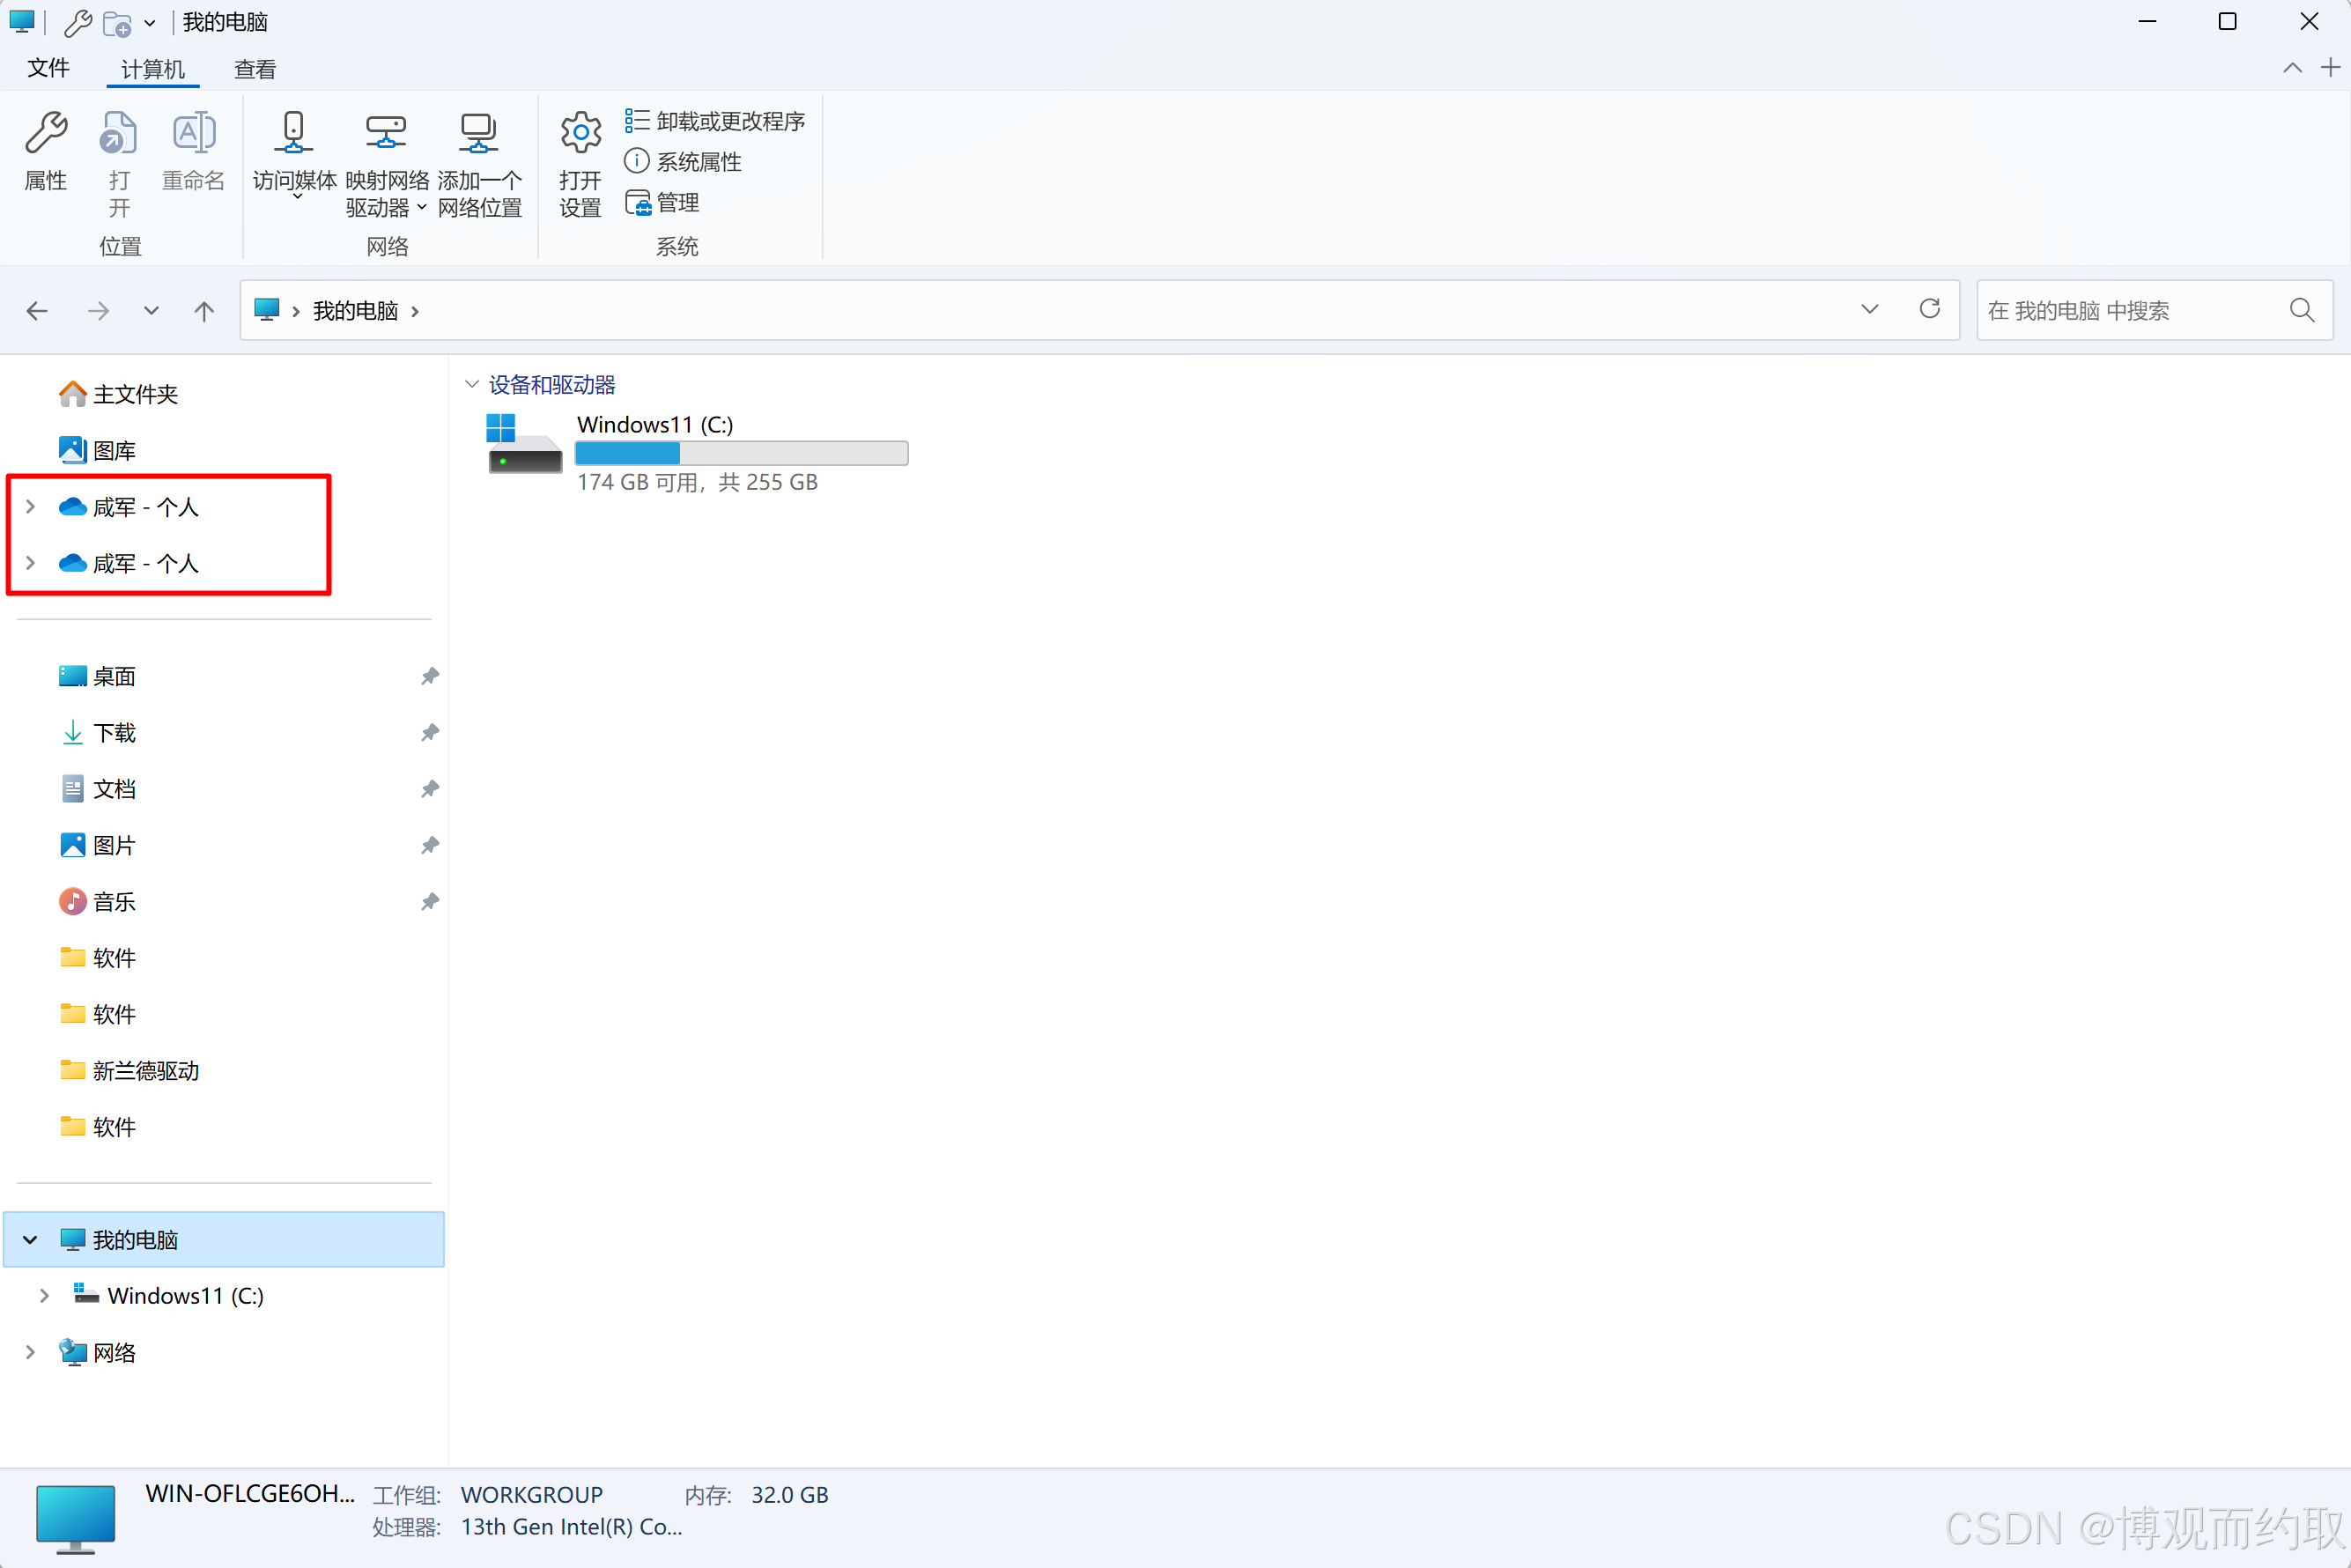
新安装的windows系统安装onedrive后,在资源管理器侧边栏存在两个快速访问入口,强迫症的我想删掉一个只保留一个,直接右键是无法删除的。

  • 1

2. 导致因素

Windows 10 和 Windows 11 通常预装了 OneDrive,并自动为当前用户配置了一个入口。如果用户重新下载安装了一个独立版本的 OneDrive,可能会导致资源管理器同时显示两个入口。

3. 解决方案

1. 手动方案

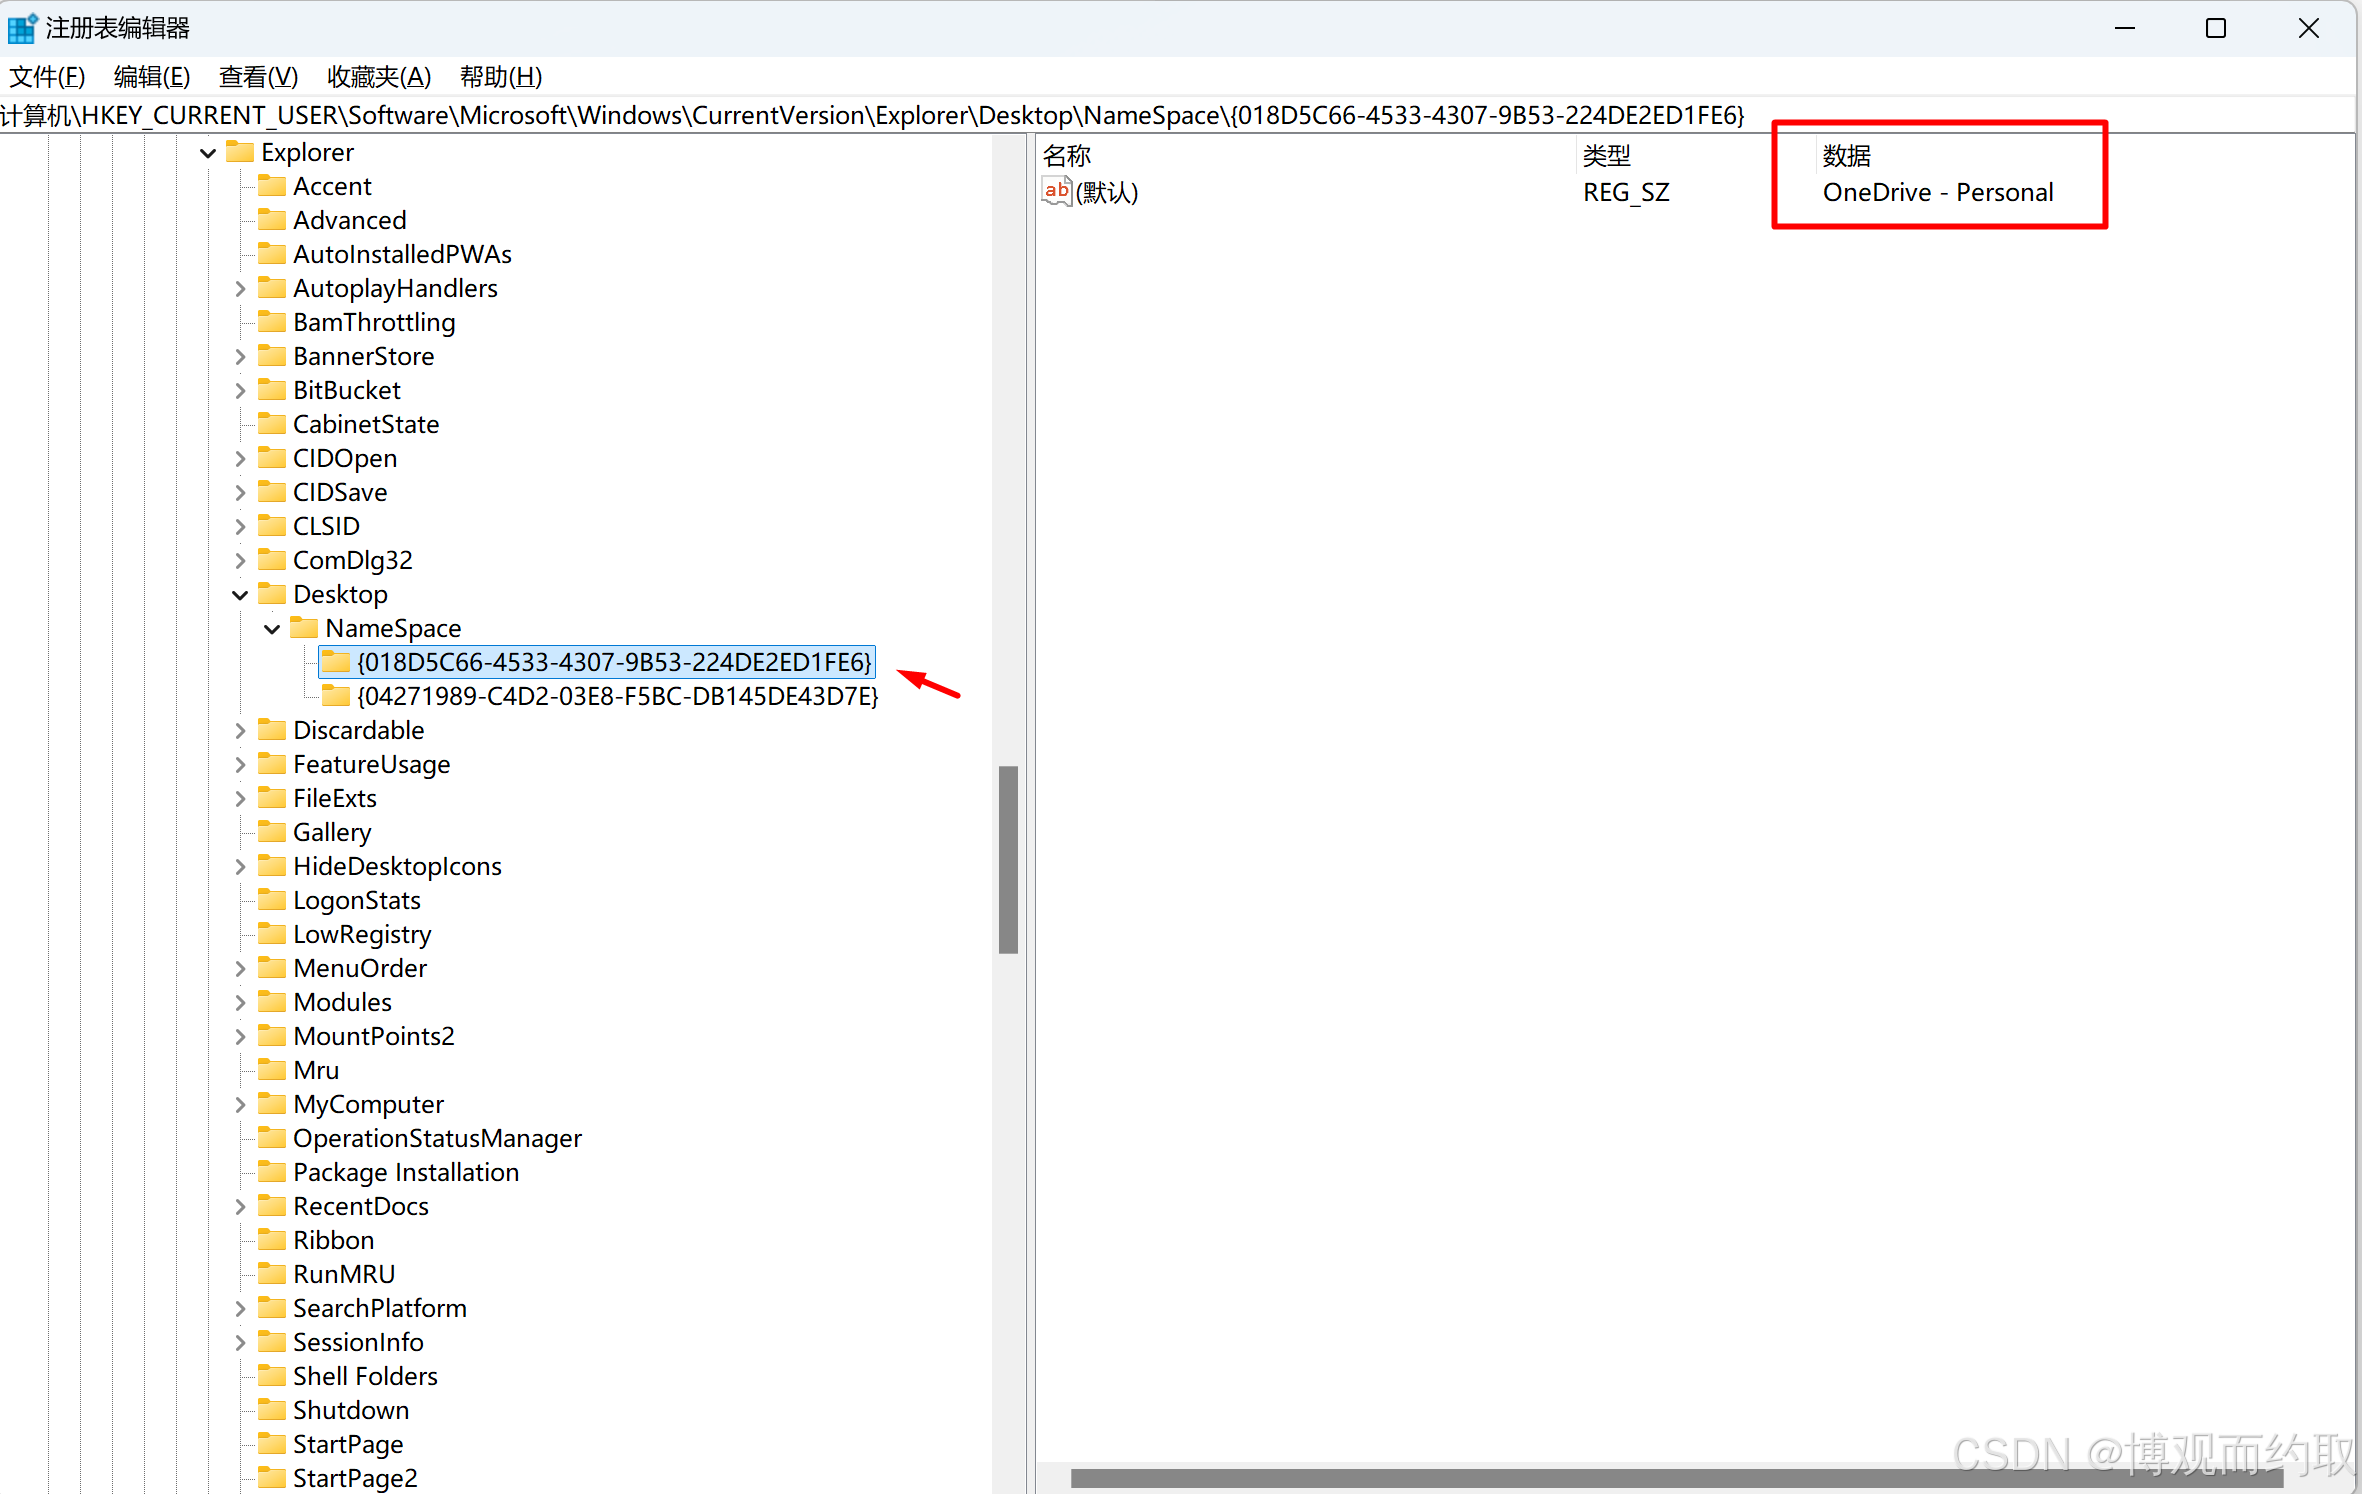
打开注册表,找到OneDrive - Personal 条目的文件夹

定位到

HKEY_CURRENT_USER\SOFTWARE\Microsoft\Windows\CurrentVersion\Explorer\Desktop\NameSpace,找到OneDrive - Personal 条目的文件夹并复制文件夹ID

  • 2

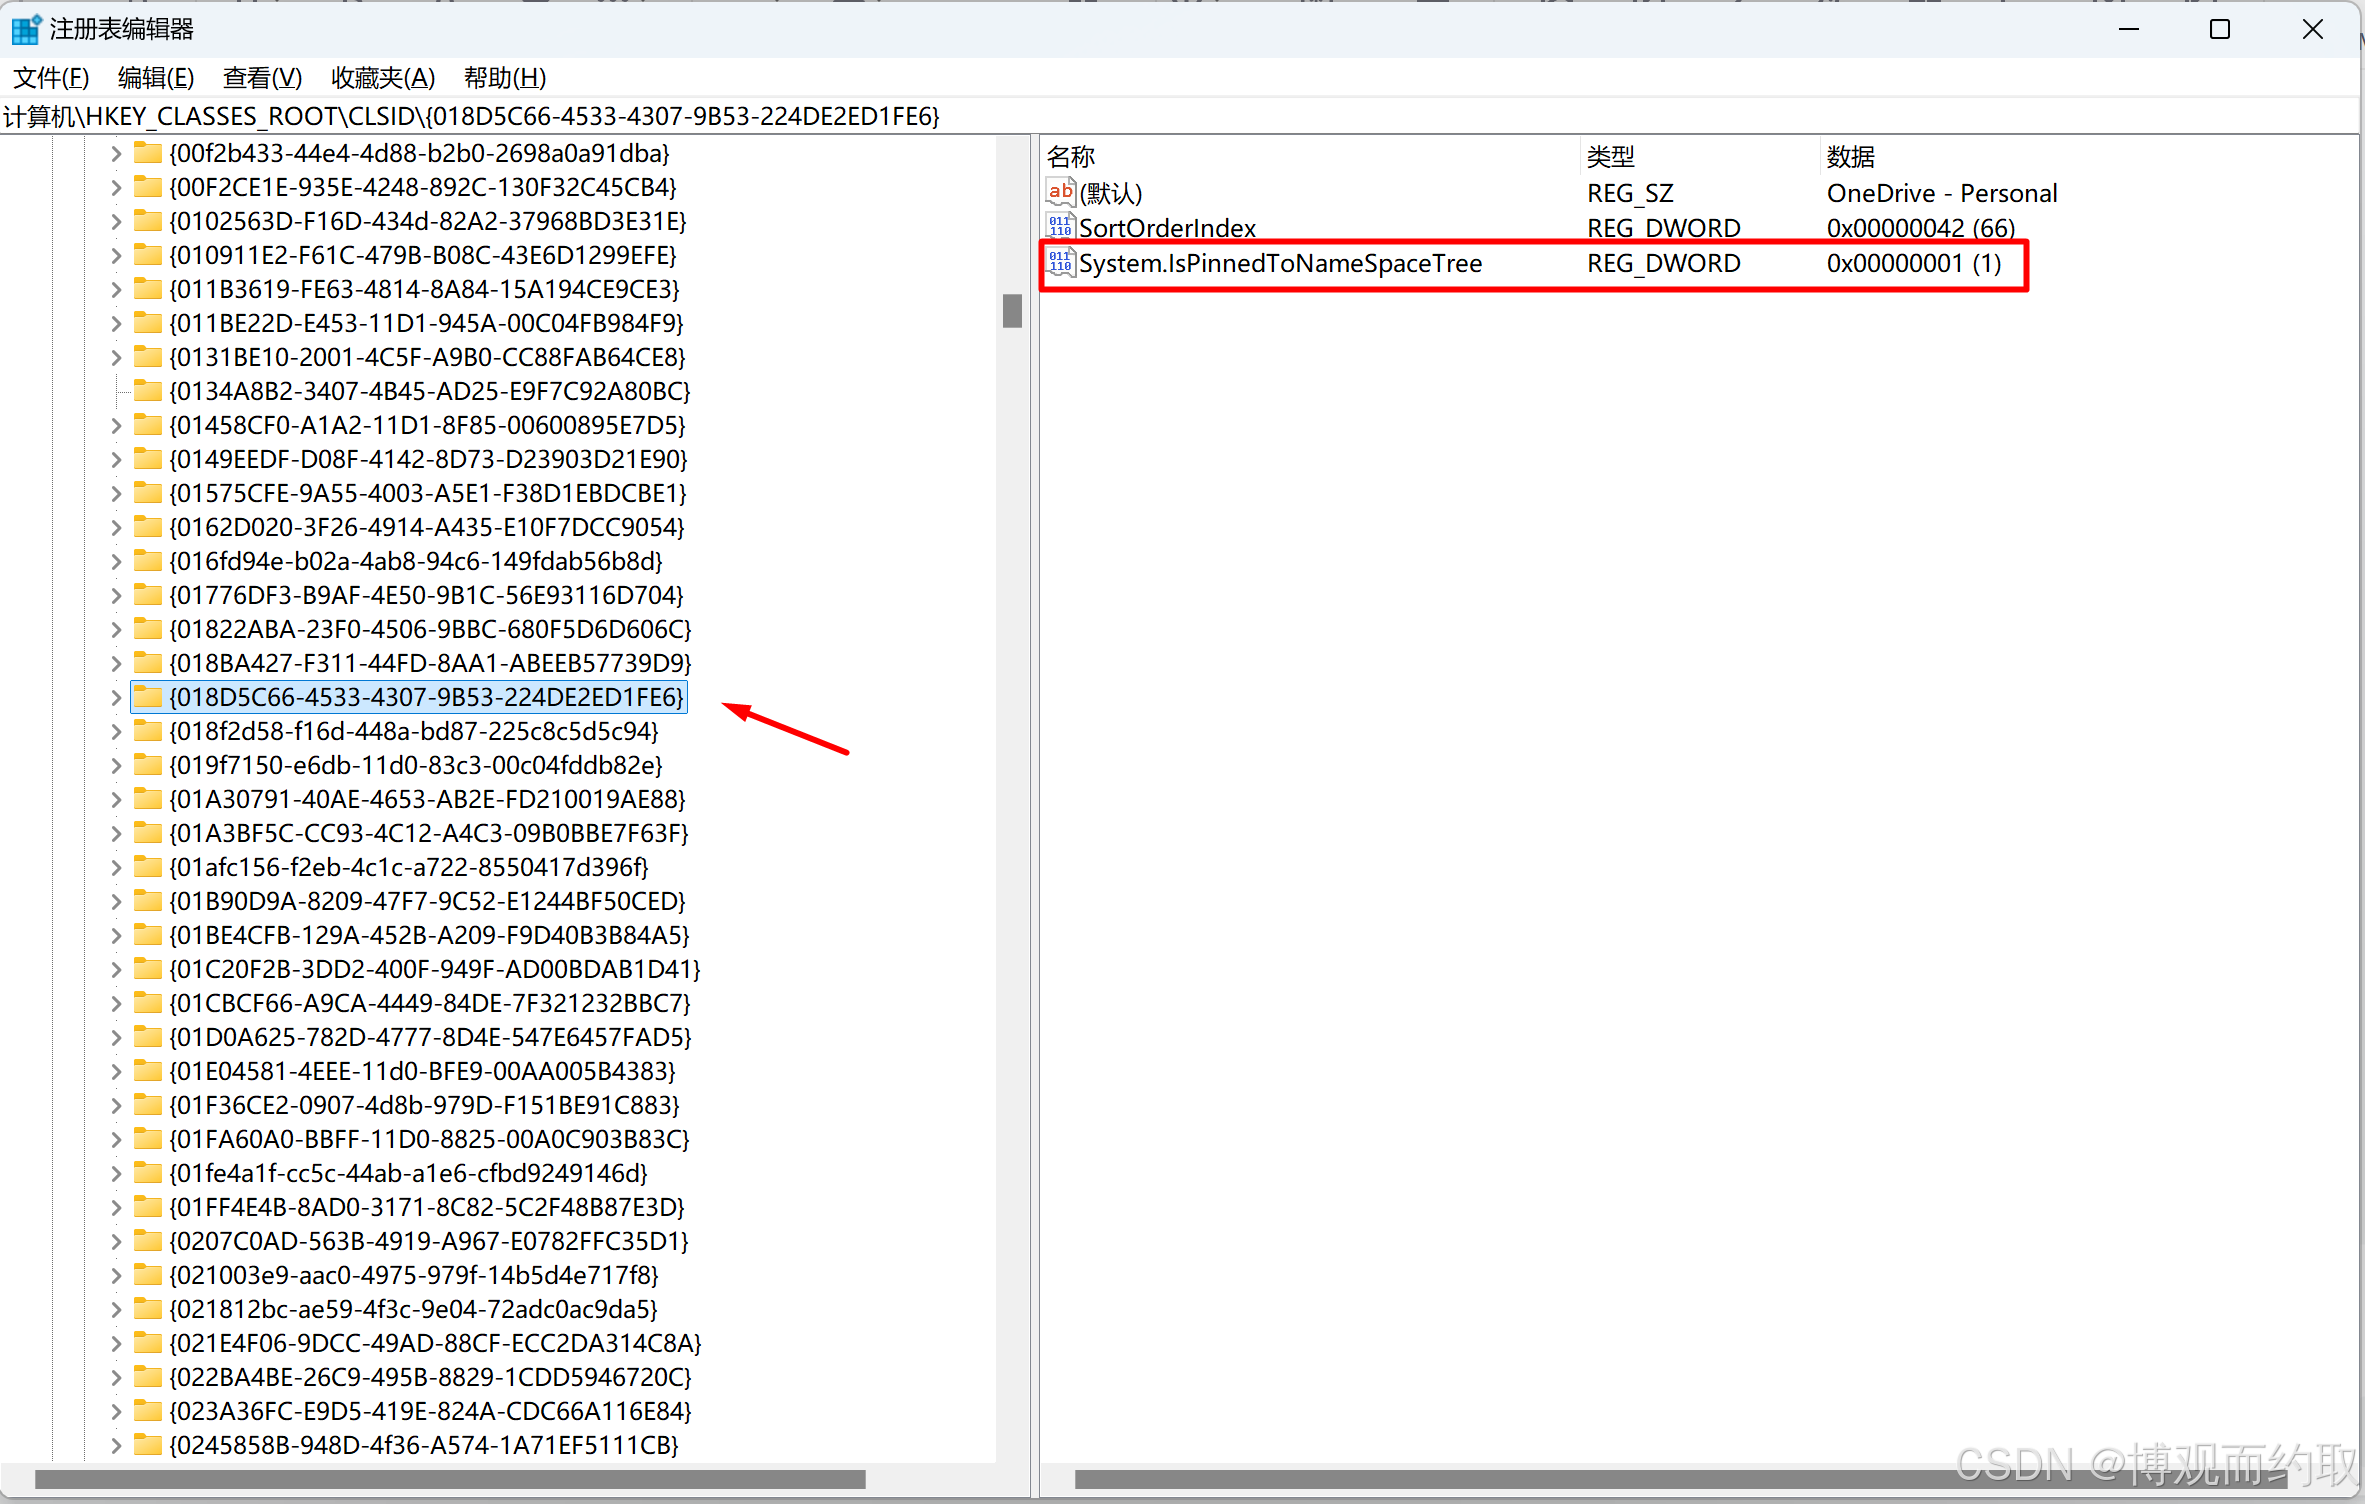
在CLSID 文件夹修改System.IsPinnedtoNameSpaceTree

注册表中再次定位到HKEY_CLASSES_ROOT\CLSID\,找到刚刚搜索到的文件夹名,把System.IsPinnedtoNameSpaceTree的值改为0,再次打开资源管理器可以看到效果。 - 3

2. 脚本方案

手动方案太麻烦,下面提供一个脚本,打开powershell运行即可。

PowerShell
 1
 2
 3
 4
 5
 6
 7
 8
 9
10
11
12
13
14
15
16
17
18
19
20
21
22
23
24
25
26
27
28
29
30
31
32
33
34
35
36
37
38
39
40
41
# 定义路径
$namespacePath = "HKCU:\Software\Microsoft\Windows\CurrentVersion\Explorer\Desktop\NameSpace"
$clsidRootPath = "HKEY_CLASSES_ROOT\CLSID"
$searchValue = "OneDrive - Personal"

# 查找 "OneDrive - Personal" 对应的 DirectoryName
$directoryName = Get-ChildItem -Path $namespacePath | ForEach-Object {
    $keyPath = $_.PSPath
    try {
        # 获取默认值
        $defaultValue = (Get-ItemProperty -Path $keyPath -ErrorAction Stop)."(default)"
        if ($defaultValue -eq $searchValue) {
            $_.PSChildName  # 返回子键名(GUID 格式)
        }
    } catch {
        Write-Warning "无法访问注册表键:$keyPath"
    }
} | Select-Object -First 1  # 只取第一个匹配的结果

# 检查是否找到 DirectoryName
if ([string]::IsNullOrWhiteSpace($directoryName)) {
    Write-Warning "未找到 'OneDrive - Personal' 对应的 DirectoryName,请检查注册表内容是否正确。"
} else {
    # 构造完整的 CLSID 注册表路径
    $targetPath = "$clsidRootPath\$directoryName"

    # 使用 .NET 访问注册表键
    try {
        $registryKey = [Microsoft.Win32.Registry]::ClassesRoot.OpenSubKey("CLSID\$directoryName", $true)
        if ($registryKey) {
            # 修改 System.IsPinnedToNameSpaceTree 的值为 0
            $registryKey.SetValue("System.IsPinnedToNameSpaceTree", 0, [Microsoft.Win32.RegistryValueKind]::DWord)
            $registryKey.Close()
            Write-Host "已成功将 $targetPath 的 'System.IsPinnedToNameSpaceTree' 修改为 0。" -ForegroundColor Green
        } else {
            Write-Warning "路径 $targetPath 不存在,无法修改。"
        }
    } catch {
        Write-Warning "无法访问或修改注册表键:$targetPath。错误信息:$_"
    }
}